
New Sewing Instructions for N.7 - Knit mini Blazer
I have recently updated the sewing instructions for the sewing pattern N.7, so I decided to insert the sewing steps in this blog post, especially for those who purchased the pattern before September 2020.
Step 1
Join the center back seams (segment X→Y) of the two front pieces P1. Make a straight stitch with a regular sewing machine at 0,7 cm from the raw edge. Press the seam open.

Step 2
On the previously joined together two front pieces P1, make a small cut almost up to the seam allowance into the corners with notch S. Then, join them to the back piece P3. Align the notches and center back. Make a straight stitch with a regular sewing machine at 0,7 cm from the raw edge. Press the seam open.


Step 3
Join the center back seams (segment Y→X) of the two lapel facing pieces P2. Make a straight stitch at 0,7 cm from the raw edge with a regular sewing machine. Press the seams open.

Step 4
Join the lapel facing to the bodice. Align the notches and center back. Make a straight stitch starting from the notch Z on one side of the garment to notch Z on the other side of the garment - leaving 0,7 cm of seam allowance on facing at the start and the end. See the photos for more instructions.


Trim some seam allowance at corners and at joints to reduce bulk. Make a small cut almost up to the seam allowance into the corners.
Press the seam opened, where is possible, then, press it to one side - toward front P1.


On the right side of the garment, make a top-stitch on the front P1 at 2/3 mm from the seam, star from notch/corner E on one side of the garment, and end in notch/corner E on the other side of the garment. Catch the two seam allowances under the stitch.

With a Point Turner & Seam Creaser or dressmaker shears* mold the lapel seam and corners, then press well to flatten.
*Note: Not all dressmaker shears are suitable for turning corners and seam molding. For good measure, use Point Turner & Seam Creaser tool - in order not to damage the garment.

Step 5
Sew the sleeves to the bodice on the serger. Remember to align the notches. Press the seams at the end.

Step 6
Use the serger to sew the side seams. Press the seams at the end.

Step 7
Set-in the shoulder pads. Fold the shoulder pad in half so that one side is about 1 cm longer (see the alongside photos) - pin the longer half to the front and the shorter to the back. Also, align the shoulder pad edge with the sleeve cap seam allowance's edge - so that the shoulder pad protrudes a few millimeters over the garment's shoulder. Fix in place the shoulder pad by making a hand stitch shown in the following photos.
Note: The above instructions are not a rule. I recommend trying the garment on with the shoulder pads just pinned (pins on the right side of the garment), then adjust the shoulder pad placement according to your posture.


Step 8
Join using a serger the lining shoulder seams, front P5 with back P3. Press the seams toward the back.

Step 9
Add the sleeves to the lining. Sew them using a serger.

Step 10
Join using a serger the side seams of the lining.
Step 11
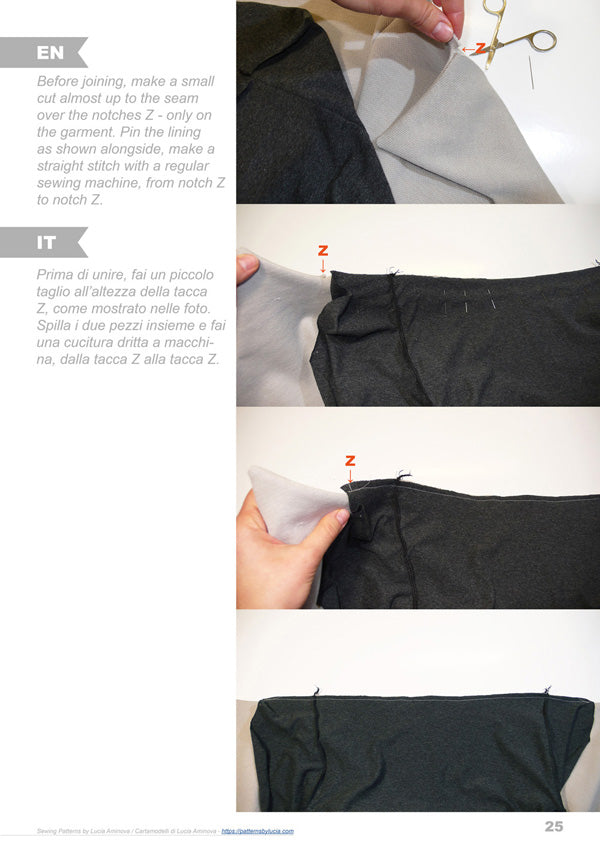
Add the lining to the garment. Start joining the hems - from notch Z to notch Z, align the side seams and center back.

Before joining, make a small cut almost up to the seam over the notches Z - only on the garment. Pin the lining as shown alongside, make a straight stitch with a regular sewing machine, from notch Z to notch Z.
Press the seam, firstly opened, then to one side - toward the lining. Trim the bulky seams, then make a top-stitch on the right side of the garment (on the lining side) - taking care to catch the seam allowances under the stitch.

Join the lining to the lapel facing. Align the notches. Make a straight stitch with a regular sewing machine at 0,7 cm from the raw edge. Leave an opening between the S notches; you will need it to turn the garment on the right side.

Join the lining to the sleeves. Turn the garment on the right side, pin* the lining sleeves to the garment sleeves taking care that the lining inside the sleeves isn’t twisted - then turn the garment on its wrong side and stitch the hems of the sleeves with the lining using a regular sewing machine at 0,7 cm from the raw edge.
Note: Or put some safety pins - pins may fall out when you turn the garment on the wrong side.

Turn the garment on the right side and close the opening between the S notches. Stitch by hand or make a top-stitch right on the edge of the lining. Then press well all the seams.


Step 12
Finally, fix with a hand stitch the collar, the lapels, and the sleeves, see the photos.


You can get this pattern here on my website or Etsy. If you have any questions, don't hesitate to get in touch with me.